Showing posts with label BLOG TIPS. Show all posts

How to Submit Your Blog or Website to Alexa Step by Step with Pictures

on Monday, 16 September 2013

You must submit your blog or website to alexa. Alexa give ranks to new domain itself but for more improvement into your Alexa rank, you can submit your website and claim your ownership at alexa for more advantage. Here I describe how you can submit your website to alexa.

Why Submit a Blog or Website to Alexa?

Alexa is best website ranking service. It’s the parameter for website the how it popular. So it’s always beneficial for your blog to submit on Alexa. And one more thing all the advertisers use Alexa Rank and find contact details. So today I write a guide post for beginners that how to submit you your blog /website to Alexa.
Check your rank at- http://www.alexa.com/siteinfo

HOW TO SUBMIT YOUR BLOG OR WEBSITE TO ALEXA?

Step 1. Create account on Alexa
If you are looking to add your Blog to Alexa than first you need an account on Alexa. To add your Blog on  Alexa, first you require  to certify your Blog on Alexa.
1.First Visit Alexa.com and create an account.
You can create a account with your email another option facebook is also available. You can also create account by simply login with your facebook account.

Now you have created account on Alexa, check that you are logged into Alexa.
Step 2. Claim your blog on Alexa
Now go to alexa site owner claim page link-http://www.alexa.com/siteowners/claim
And fill in text box your blog/website domain name and click on “Claim your Site” button. As shown in below picture.
After clicking on claim your site button a new page will be open, on this page all the plans and offers are present. As shown below photo. I recommend you to choose the free plan for your blog or website.
Now click on “Sign Up” below the Free Plan.
Step 3. Verifying Blog/Website on Alexa
Now you need to verify your ownership at alexa.  
After clicking on the Sign up page, Again a new page open. It will show verification details for your blog or website.
You have two methods to verify ID. First via verify the file on your site and second is via adding Meta tags into your blog template.
Normally for blogger we use second method via adding Meta tag.
Now go to your blogger dashboard next on template and search <head>.  Now add the below line after <head>  
<meta name=”alexaVerifyID” content=”xxxxxxxxxxxxxxxxx” />
Replace ‘xxxxxxxxxxxxxxxxx’ with your blogger alexa verification ID.
After adding it into your blog template come back on alexa website page and click on “Verify claim”.
If you do everything right than you will get a successfully message shown like the photo below.
Now Click on continue and add your blog details such as site URL, site title, description and you can also add your public contact information. See the below picture.
You have done.
Congratulations! You have successfully submitted your Blog/website on Alexa.
I hope you like this article on submit your Blog/Website to Alexa.It is always a good idea to submit a blog on blog directories and websites to create back link but always keep in mind don’t submit at any authorize site. Thanks
- See more at: http://www.bloggerexplorer.com/2013/03/how-to-submit-your-blog-or-website-to.html#sthash.xEXDlrPC.dpuf
Tag :

Fading Box With Newer/Older Posts Links and Titles for Blogger

on Wednesday, 28 August 2013

The navigation links are those that appear at the bottom of the page that says "Older Posts", "Newer Posts" and "Home" and help us to move through the blog posts. This tutorial will show you how to change the word "Older Posts" and "Newer Posts" for post titles and make these to appear in a box "fading" when you scroll down the page.

blogger gadgets, navigation for blogger

You can see it in action on this demo blog - when you scroll down, the navigation links will appear showing the post titles for the older/newer entries.

This way to display the navigation links will be seen only in individual entries, while those on the homepage and other parts of the blog will still be displayed as usual.

How to Add Navigation Box with Newer & Older Posts on Blogger

Step 1. From your Blogger Dashboard, go to Template > Edit HTML, click anywhere inside the code area and search - using CTRL + F - for this line:

<b:include name='nextprev'/>

Screenshot:

Step 2. REPLACE the code above with this one:

<b:if cond='data:blog.pageType != &quot;item&quot;'>
<b:include name='nextprev'/>
</b:if>
<b:if cond='data:blog.pageType == &quot;item&quot;'>
<div id='blog-pager-box'>
<h4>Other posts published:</h4>
<b:include name='nextprev'/>
</div>
</b:if>

Note: you can change the "Other posts published" title with your own

Step 3. Now add just above </head> the following code:

<b:if cond='data:blog.pageType == &quot;item&quot;'>
<script src='http://ajax.googleapis.com/ajax/libs/jquery/1.8.2/jquery.min.js' type='text/javascript'/>
<script>
// <![CDATA[
$(function() {
$('#blog-pager-box').toggle()
.css({
width: '520px',
height: '150px',
position: 'fixed',
padding: '1em',
bottom: 0,
right: 0,
background: 'url(https://blogger.googleusercontent.com/img/b/R29vZ2xl/AVvXsEhCmhfOSIpZ_3uASMOvITi6nuT6AJ_8uV9mR5Z8L6t6JfqKw_k9XItRRLUtcYctoCPmn1ziB2L6tKS0iWBewXxp2Ry_NO6CeqX090W3hZaLrc4pAEjDIEO0U10zuTDrh8hyLxtCb9q3gVJI/s1600/paper.jpg)'
});

$(window).scroll(function() {
if($(this).scrollTop() > 100) {
$('#blog-pager-box').fadeIn();
} else {
$('#blog-pager-box').fadeOut();
}
});
});
$(document).ready(function(){
var newerLink = $("a.blog-pager-newer-link").attr("href");
$("a.blog-pager-newer-link").load(newerLink+" .post-title:first", function() {
var newerLinkTitle = $("a.blog-pager-newer-link:first").text();
$(".blog-pager-newer-link").html("<div>Newer Posts:</div>" + newerLinkTitle);
});
var olderLink = $("a.blog-pager-older-link").attr("href");
$("a.blog-pager-older-link").load(olderLink+" .post-title:first", function() {
var olderLinkTitle = $("a.blog-pager-older-link").text();
$(".blog-pager-older-link").html("<div>Older Posts:</div>" + olderLinkTitle);
});
});
// ]]>
</script>

<style type='text/css'>
<!--
#blog-pager-box {
box-shadow: 0 0 3px #AEAEAE;
z-index:9;
}

#blog-pager-box h4 {
margin:0;
padding:0;
color:#4898B9; /* Widget's title color */
font-size:16px; /* Title font size */
}

#blog-pager-newer-link {float:left;clear:both;line-height:30px;}
#blog-pager-older-link {float:left;clear:both;line-height:30px;}
.home-link {display:none;}
.blog-pager-older-link, .blog-pager-newer-link {
background-color: transparent !important;
background-image: none !important;
border:0 !important;
color: #4B4B4B !important; /* Color of the links */
float: left;
width: 500px;
clear:both;
}

a.blog-pager-older-link:hover, a.blog-pager-newer-link:hover {
text-decoration:none !important;
}
 
a.blog-pager-newer-link:before {
content: url(https://blogger.googleusercontent.com/img/b/R29vZ2xl/AVvXsEhpFQZcRm_Tv9RM2RT_3K5P5O8uLSPWWw79koMcgNbwr7idgrU7K2b_WKH5iktuTpafnwABSH4xQBBgGY8DaTYAyZaG8AvexexPDRScR_9FUknLjurRmYvBTtxPFV9GgxWqjPwz_xpj4jc/s1600/back.png);
float:left;
}
a.blog-pager-older-link:before {
content: url(https://blogger.googleusercontent.com/img/b/R29vZ2xl/AVvXsEhvNwB5A_Hgod329iVdfkp1MJRyAFRFq4jf5BHeQStpaQ0YfyA5ugIFmPgG0sqkLREPRDQRQ2UfaX0BZkVKKS_-IrNSkIxZ0Tj4bca1BRt0_8Mz6UhlIi9PF9RDt-CyxkhvI6GNtAY5cNg/s1600/forward.png);
float:left;
}
#blog-pager {
width:500px;
background-color: transparent !important;
background-image: none !important;
border:0 !important;
text-align:left;
}
 
#blog-pager div {
color:#0577AB; /* Color for the "Newer Posts" and "Older Posts" text */
font-weight:bold;
margin-bottom: -5px;
}
a#blog-pager div:hover {
text-decoration:none !important;
color:#4898B9; /* Color for the "Newer Posts" and "Older Posts" text */
}
-->
</style>
</b:if>

Note that this gadget uses jQuery, so try to have only one version.


Customization:


- There are three URLs in blue, the first is the paper background image for the box, the other two are the icons that correspond to the arrows. You can replace these with your own.
- In green you can see where to change the text colors.
- The red number is the distance in pixels that activates the gadget, this means that the box will appear when you scroll down the 100px. You can use a higher value if your posts are usually long and therefore the "height" of the scroll is greater.

Step 4. Now, Save the Template and that's it!

You can also change the "Older Posts" and "Newer Posts" links with posts titles or images.
Tag : ,

How To Add Related Posts Widget To Blogger with Thumbnails

Now here is a wonderful hack for displaying related posts beneath each of your blog posts, along with thumbnails. The related articles are chosen from other posts in that same category/label/tag. With this hack many of your readers will remain on your site for longer periods of time when they see related posts of interest.

related post, related posts blogger, blogger widgets
Steps adding the Related Posts Widget to Blogger/Blogspot

Step 1. Go To Blogger Dashboard >> Template >>Edit HTML;

Step 2. Check the "Expand widgets template" box;

Step 3. Search (CTRL + F) for this piece of code:

</head>

Step 4. Copy and paste the below code just before/above </head>


<!--Related Posts with thumbnails Scripts and Styles Start-->
<!-- remove --><b:if cond='data:blog.pageType == &quot;item&quot;'>
<style type='text/css'>
#related-posts {
float:center;
text-transform:none;
height:100%;
min-height:100%;
padding-top:5px;
padding-left:5px;
}

#related-posts h2{
font-size: 18px;
letter-spacing: 2px;
font-weight: bold;
text-transform: none;
color: #5D5D5D;
font-family: Arial Narrow;
margin-bottom: 0.75em;
margin-top: 0em;
padding-top: 0em;
}
#related-posts a{
border-right: 1px dotted #DDDDDD;
color:#5D5D5D;
}
#related-posts a:hover{
color:black;
background-color:#EDEDEF;
}
</style>
<script type='text/javascript'>
var defaultnoimage=&quot;https://blogger.googleusercontent.com/img/b/R29vZ2xl/AVvXsEjYtkRdzb3SP7tYHTrgHoyHB2fTcTlSCLYUdiJTTg72pg5vE6FhFtYwGKNnDhvVGWxuImcS5ZMsl8W7xKE1fP3sWPB_8xBkJ00jADJdLzpc8oXHnNMEPucEV2Xm3j89EJdeOC0JOFazS7_F/s1600/no_image.jpg&quot;;
var maxresults=5;
var splittercolor=&quot;#DDDDDD&quot;;
var relatedpoststitle=&quot;Related Posts&quot;;
</script>
<script src='http://helplogger.googlecode.com/svn/trunk/related-posts-with-big-thumbnails.js' type='text/javascript'/>
<!-- remove --></b:if>
<!--Related Posts with thumbnails Scripts and Styles End-->

Note:
- to change the default picture, replace the URL in blue with your own
- for displaying more than 5 posts, replace 5 value from "var maxresults=5;"
- remove the code in violet if you want the related posts to be displayed in homepage too

Step 5. Now find the following code:

    <div class='post-footer'>

Step 6. And just above it, copy and paste the below code:

<!-- Related Posts with Thumbnails Code Start-->
<!-- remove --><b:if cond='data:blog.pageType == &quot;item&quot;'>
<div id='related-posts'>
<b:loop values='data:post.labels' var='label'>
<b:if cond='data:label.isLast != &quot;true&quot;'>
</b:if>
<script expr:src='&quot;/feeds/posts/default/-/&quot; + data:label.name + &quot;?alt=json-in-script&amp;callback=related_results_labels_thumbs&amp;max-results=6&quot;' type='text/javascript'/></b:loop>
<script type='text/javascript'>
removeRelatedDuplicates_thumbs();
printRelatedLabels_thumbs(&quot;<data:post.url/>&quot;);
</script>
</div><div style='clear:both'/>
<!-- remove --></b:if>
<b:if cond='data:blog.url == data:blog.homepageUrl'><b:if cond='data:post.isFirstPost'>
<a href='http://helplogger.blogspot.com'><img alt='Blogger Tricks' src='https://blogger.googleusercontent.com/img/b/R29vZ2xl/AVvXsEjaU7xMXCNZDgO27FhSr0A6Vr16yx7x0ZfNSGwbK1m8QtrMC70MJ8NZtj85bv3_ghG9xHfaFR4Jr55OAUdSYlZwQj_KKP-tfw0X0RLeM-pb6vOAMt60EdcuVB2pT-W8EhlQt5Obe-WO0Jzd/s1600/best+blogger+tips.png'/></a>
</b:if></b:if>
<!-- Related Posts with Thumbnails Code End-->

Note:
- change the 6 value from max-results=with the number of posts you want to be displayed.
- If you want the related posts to be displayed on homepage too, remove the code in violet.

Step 7. Save the Template

Enjoy :)
Tag :

How to add a gadget/widget inside your Blogger Blog header

Maybe you have seen that many blogs have AdSense Units or other ads and widgets in the header section of the blog, the most popular format being the AdSense 468x60 ad unit - see in the screenshot below:


But how we can add something inside blogger header - be it a Adsense unit, a search bar, social media buttons or a widget? By simply adding a section in the header. First off, to give space for the extra gadget to fit in, our blogger header should be resized.

A. Resize blogger header

Step 1: Go to Blogger Dashboard > Template > Edit HTML and backup your template

Step 2: Click anywhere inside the code area and open the search box by using the CTRL + F keys:
adsense, blogger tricks, blogger widgets

Step 3: Search for this piece of code:
/* Header
----------------------------------------------- */
Note: If you can't find it, search only for the first line:
/* Header

Screenshot:
blogger gadgets, blogger widgets, blogspot tricks

Step 4: Replace it with this code:
/* Header
----------------------------------------------- */
.header-left{
display: inline-block;
height: 35px;
width: 350px;
float: left;
}
.header-right {
display:inline-block;
float:right;
}

Change the pixels in red with the image's height and width of your blogger header and change float: left; to float: right; if you want to change the position of your logo.

Step 5: Find the below code:
<b:section class='header' id='header' maxwidgets='1' showaddelement='no'>

Step 6: Replace it with:
<b:section class='header header-left' id='header' maxwidgets='1' showaddelement='no'>

Now "Preview" your template, you will find that the background color of Blogger's header is not visible or it's missing. To bring it back, you need to add some more snippets:

Step 7. Find the following code:
    </div>
    </div>
    <div class='header-cap-bottom cap-bottom'>
      <div class='cap-left'/>

Step 8. Just above it, paste this:
<div style='clear:both;'/>

Note: if you can't find the code from step 7, search for this instead:
      <b:include name='description'/>
    </div>
  </b:if>
</b:includable>
</b:widget>
</b:section>
... and paste the code from step 8 just below it.

B. Add extra gadget/widget section to Blogger Header

Let's go one step forward and add an extra gadget section within Blogger header in new template designers.

Step 9. Just below the code from step 8, paste this codejust before/above it:
<b:section class='header-right crosscol' id='header-right' maxwidgets='1' showaddelement='yes'/>

Step 10. Now find:
]]></b:skin>

Step 11. Paste just above it, this CSS code:
.header-right {
display:inline-block;
float:right;
width:400px;
}

Change the width that is marked in red color. Increase or decrease the pixels according to your needs and positioning new header section.

Step 12. Save the Template.

Step 13. Now all you have to do is to go to Layout and Add a Gadget to the newly created extra header section in Blogger.

widgets for blogger, blogger tricks

The widget now should appear side by side.

If you have any questions or need some help, leave a comment below.
Tag :

How to Make Category Tabs in Blogger

on Wednesday, 21 August 2013

It was a great addition to Blogger when they added the tab menus as a feature. However, many times I've heard people asking how they can alter their menu tabs to be Blogger categories instead of Pages. Good news is that this is a very simple thing to do and only requires a few steps.

What you may not have realized is that in the Blogger Pages menu item is the ability to link to a URL instead of a Blogger Page and that Blogger categories (or labels) are just that - blogger URLs.


Getting the Category URLs

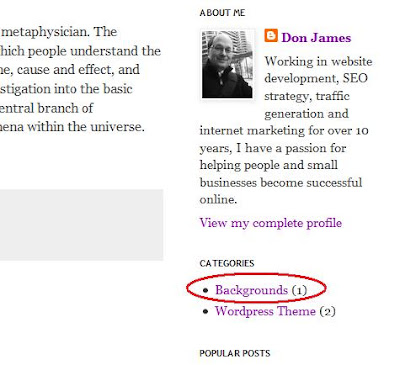
First thing you want to do is to make sure each of your posts have labels defined. If you want your posts to be seen in only one category then you can only give each post a single label. Next stepis to find the URL of one of your Blogger categories by clicking on the category directly like this:

blogger category labels
In my Wordpress test template blog you can see I have 2 labels or categories defined. Once you click on it go up to your browser's URL to see what the category link is. Interesting result -- they're just searches:

search url for blogger categories

You can sese that the label URL is just (yourblog)/search/label/(labelname). Make a copy of your label URL and save it off to the side for a moment.

Setting the Tabs to Point to a URL

Now, go to the Blogger main menu and select the 'Pages' item and 'New Page':

editing pages in blogger
What you'll see at this point is a drop down selection of if you want a new Blank page or to enter a Web address.  Select the 'Web address' like so:
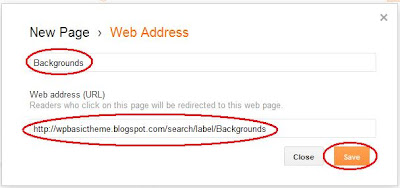
What you'll want to do now is to enter your Lable/Category in the first text box and the URL you just saved in the 'Web address (URL)' box like this:

setting the web address to a search page
 
Press 'Save' to add this category page to your list of Pages. If you read some of my earlier tutorials you saw that in order for tab menus to appear on you blog, you first have to set the 'Show pages as' to 'Top tabs':


in order for them to show up on your blog. Be sure the 'Pages' widget is added as well in the Layout manu of your blog in the right spot - this is where the Tabs will show (ignore the 'Edit' button here - just make sure the Pages widget is there):

 
Once you save your template you should see your new tab at the top of your blog:

Blogger tab menu
If you click on this what happens is you're directed to the URL you entered in the Pages section. One thing you may notice right away, however, is this not so nice search result image at the top of your blog:


Removing the Search Label

If you don't like that appearing you can remove it by editing your template directly. Just go into the template editor and choose 'Edit HTML':

If you hadn't noticed there was a change in the html editor for Blogger. Key things to note are the expand triangle on the side, the new 'Jump to widget' dropdown, and the selections within:

new Blogger template editor

The search result image that we want to remove is located just above the Blog section of your template. In my case it is called 'Blog1' which is the default. However, yours may have a different name if you named your Blog widget different.  Just select that from the drop down and expand the triangles next to the lines that have widget: id='Blog1' and widget: id='main' like this:


What you're looking for is the ling that says b:include data='top' name='status-message'. That is the status image we want to disable. Just add the html comment characters (<!-- and -->) to both end like I've circled above to disable that message.  Save your template.

That's it! You now have a menu tuned to your categories rather than pages. This will be especially useful if you have a news site. You can look at my tab example called 'Backgrounds' on my Wordpress test template blog here:


Good luck!
Tag :

UpLoad Your Picture

advertiser

Search This Blog

advertiser